Starlight

Starlight1

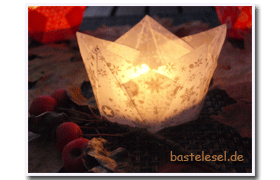
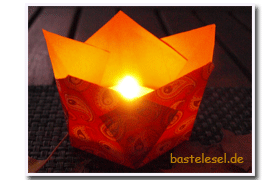
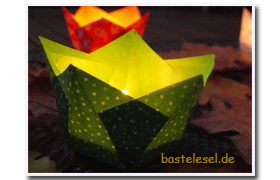
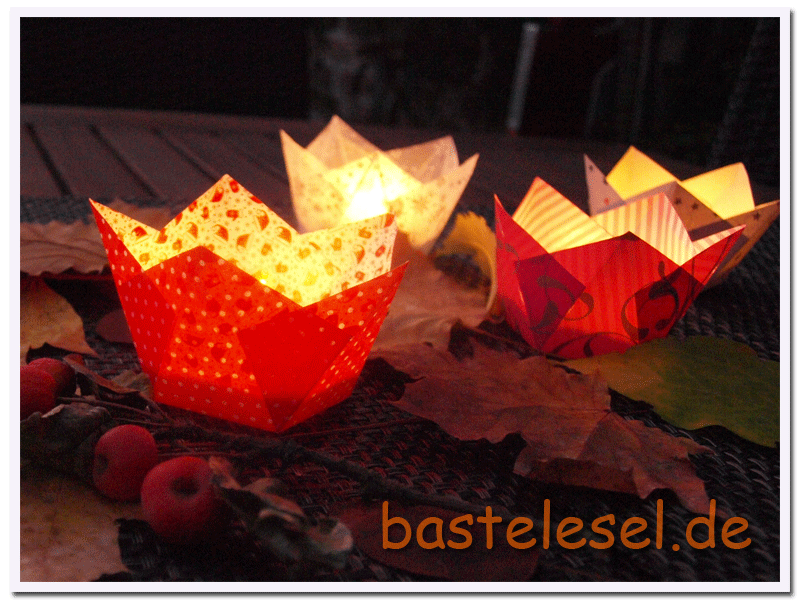
Season of lights – colored leaves, beechnuts and some wild crabapples will make a nice decoration. I found these wunderful lights somewhere in the web but can’t find trace it back any more. That’s why I had to make my own template. A pentagon is the base of this tealight holder. Simply copy my template or have a look at this site showing a simple trick to make one yourself.

Starlight3Starlight4

 Für PDF Fünfeck anklicken/click pentagon for free template/cliquez pentagone pour gabarit gratuit.

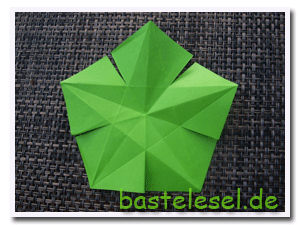
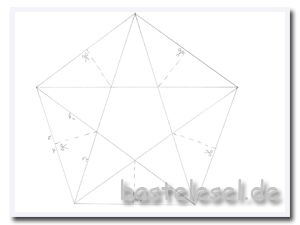
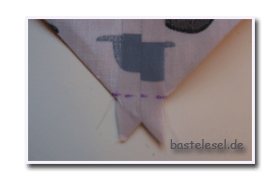
Fold the pentagon from the tip to the base points of your pentagon as shown in the right picture above. Turn clockwise and repeat with every tip and base. Cut in the dotted lines. Then fold them one on top of the other so that the edges will touch the triangle’s sides and fix with some glue.Starlight2 
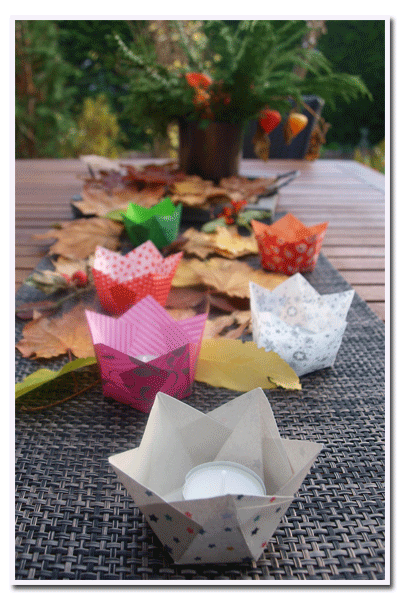
The picture at the side shows the overlapping halves quite well. I took different papers to make the lights, matching either with the season or the colors of the table. On the left from behind a shining Christmas paper, on the right from behind a paisley print in different autumnal orange shades. The white and silver paper is rather lucent. Be careful when folding this paper because it crushes easily. In the foreground we have a light made with some stronger paper. Folding needs to be done very carefully because the paper doesn’t allow any corrections lateron. Depending on the chosen paper the lights will glow more or less brightly. They’re looking even nicer if the paper is printed on both sides. Place the tealight directly in the middle of your folded star or use a glass tealight holder for more safety. If you want to increase the glowing  then simply grease your lights with some cooking oil. (Carefully apply it lightly with a soft brush.) The light holders need drying for at least 24 hours to avoid marks on your table or furniture.

Starlight5Starlight6Starlight7

Bavarian Pretzels or bread rolls

Laugenbroetchen1

Just done they’re best and we prefer them as bread rolls to be served with sausage or cheese. Unfortunately not every bakery’s offering them. So just prepare them at home and eat them directly from the oven – there’s nothing better.
Besides the ingredients for traditional bread rolls (s. “Crispy bread rolls” – but without herbs) you’ll need 1 liter of water, 40g baking soda or pretzel salt (sodium hydroxid) and some coarse sea salt. You’ll get sodium hydroxid at your local bakery or in a web shop. Prepare the dough for your bread rolls as usually and let it rest. Then divide it into 10-12 portions and make rolls. Let these rest again.
In the meantime bring the water to a boil and step by step add  the baking soda. Do this carefully because the soda will bubble heavily. It’s best to wear gloves and glasses to avoid eyes and hands getting into contact with the soda water. Dip the rolls into the water and as soon as they come up to the surface remove them from the water and place them on a greased baking tray. Don’t use paper because it will dissolve when getting into contact with the soda. Sprinkle your rolls with some coars sea salt and cook them for 20-30 minutes at 220°C until dark brown.

Laugenbroetchen2

Remove them from the oven and cool them a bit on a wire rack. Then serve them lukewarm with soft butter.
Instead of bread rolls you may as well make pretzels with that dough. Afterwards continue as for the rolls.

Chair pads

Kissen1

Do it yourself – that’s the device after several weeks of searching for fitting chair pads. I chose a printed cotton fabric which I doubled with a simple white cotton. The pad itself is a piece of foam cut in the seating’s exact size. A simple envelope closure allows easy washing when dirty.

Kissen3Kissen5

On the site www.eenymeenyandmoe I found a wonderful description I really couldn’t have written better. When cutting your fabric please consider that besides the seam allowance you have to add the height of your foam pad to length and width of your fabric once. When your envelope closure cover is ready you have to make the box corners. With the cover wrong sides out, trim all corners. Therefor pull apart the fabric until it makes a little peak with the trimmed corner point at the top and the seam lines running down the middle of the front and the back. Carefully and precisely line up these seams. The two seam allowances should fold opposite one another. Stitch a line down from the peak having the length of your foam’s height. Cut down the triangle’s peak to a seamallowance of 0.5 cm.

Kissen6Kissen7

If you want to attach your pads to the chair’s back you have to place a folded ribbon into two of the corners before sewing. (the ribbon is placed on the right side of fabric but inside the corner – see left picture; on the right picture the end of the ribbon is visible after cutting the seam allowance)

Kissen2

After turning the cover the ribbons will sit just in both corners where you can easily knot them to the back of your chair.

Kissen4

With the remaining fabric I made a double-sided tea-cloth. The back is sewn with the white cotton fabric I took to line the pad covers.


First infinity scarf

Loop1

Most days are still sunny and we refuse to think about odd weather and freezing temperatures. Having a look at our caldendar however tells us to start with winter preparations. For the beginning we’ll make a really thick and warm infinity scarf. I made it with a wool mixture for needle size 4-UK/10.5-US but knitted it with a double thread and neddles size 17 – US/12 metric. With a yardage of 142 m / 100g I needed about 270g for my scarf.
Cast on 22 stitches for a 20cm wide scarf. (Number of stitches for this pattern – divide by 4 plus 2 edge stitches)

Loop2

First row: Edge stitch (slip it), # 3 knit stitches, 1 purl; repeat from # and stop with an edge stitch (knit).
Second row: Edge stitch (slip it), # 2 knit stitches, 1 purl, 1 knit stitch # repeat sequence and finish with an edge stitch ( purl).
By slipping the first stitch of the row you make your edge tighter (because you are basically knitting this stitch every other row) and if it is done right – a beautiful braid runs along your edges.
Repeat first and second row and bind off after 130cm.

Loop4

Put ends together and sew them with a slip stitch.
Worn in a double loop even the coldest days won’t make you freeze.


Black and white cookies

Blackandwhite1

Sweet and very tasty twists with chocolate and vanilly pastry – they’re very easy to do. both pastries are rolled out to the same size and placed on top of each other. To give them a better hold spread some beaten egg white on top of one of the pastry. I took some raspberry jam to connect both sheets.

 Blackandwhite2

Cut strips 2cm wide and 12cm long.

Blackandwhite3

Take the ends of a strip with your hands and rotate them once oppositely. Place them on a greased baking tray and cook for 15-20 minutes at 180°C. Remove from the oven and leave on a rack to cool. Stored in a tin cookie jar they’ll kee several days.

Schwarz-Weiss1

Pastry:
250 g plain flour
1 tsp baking powder
150 g caster sugar
1 bag vanilla sugar
1 dash of salt
1 egg size M
125 g soft butter
15g cocoa
15g caster sugar
1 tbsp milk

Mix flour with baking powder and add other ingredients except cocoa, 15g sugar and milk. Knead until fully combined. Divide into two and add cocoa, sugar and milk to one half. Wrap in foil and keep in the fridge for half an hour. Then roll out on a floured working surface and continue as described above.