Nachhaltigkeit: Von der Jeans zum Tisch-Set

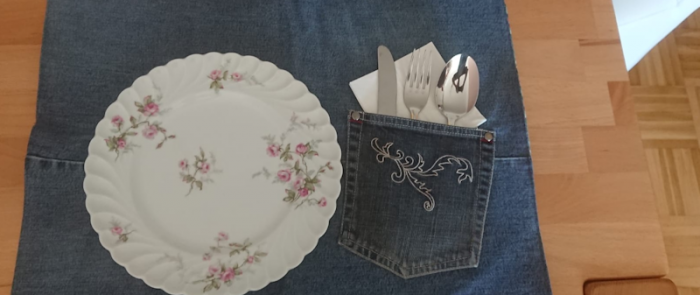
Die Teilnehmerinnen der AWO-Nähkurse beteiligen sich mit einer Aktion an der Nachhaltigkeitswoche der Werbegemeinschaft Lintorf. Schon in den Wochen vorher wurden alte Jeans gesammelt, die nicht mehr passten oder gefielen. Gemeinsam hat man dann nach verschiedenen Weiterverwendungsmöglichkeiten gesucht. Der kleinste gemeinsame Nenner waren doppelseitige Wende-Tischsets, die sowohl von Anfängern als auch von Fortgeschrittenen genäht werden können.

Aus den abgetrennten Hosenbeinen müssen die Set-Teile geschnitten werden. Dazu schneidet man die dickste Naht der Beine auf, da diese bei den Sets sonst stören würde. Anschließen bügelt man die Beine noch einmal glatt und schaut dann, an welcher Stelle das Set am besten ausgeschnitten werden kann. Unsere bebilderte Anleitung geht von einer fertigen Größe von 40 x 30cm aus. Wegen der erforderlichen Nahtzugabe müssen also 42 x 32cm ausgeschnitten werden. Bei größeren Stoffteilen kann man die Sets natürlich auch größer nähen.

Für die Nähanleitung das Bild in der Galerie anklicken, lesen und Schritt für Schritt nacharbeiten.

End of the year

2018_Weihnachten2

Christmas crown

2018_Papierkrone1

This little Christmas crown’s perfect as a little goodie for a Holiday invitation or as a place holder for your festive Christmas table. Fill it with everything you like for Christmas. We took a small Christma ball, some angels hair, some fir twigs, pearls, a white feather and a small heart made of handmade porcelain. You’ll need a piece of card stock paper (120g) mesuring at least 20 x 15,5 cm. The free template  shows exactly how to cut the six points of my crown. The 0.5cm stripe on the right side will be needed for closing it into a round. After glueing it the crown’s last tip needs to be recut. When dried put some further glue on the crown’s bottom and place it on your remaining piece of cardstock. Leave for drying and before starting to decorate your crown just cut away the outstanding cardstock. Then use the back of a knife or a folding tool to bow the crown’s tips. If you like it a bit glittery just shadow the edges with silver stamping color.

2018_Papierkrone3

If you like to use the crown as a place holder then just attach a little name tag outside or put it beside the Christmas ball. For a better stand I put my crwon on top of a wooden star matching with those holding my Christmas candles. My name tag’s just sitting under the crown so that I can easily take it away and use the crown elsewhere. You could as well use the little paper star inside the crown to write down the guest’s name. In case of using the crown as a little gift you should fix it with some glue to the wooden star.

2018_Papierkrone2

Here my crown’s sitting in a small wooden tray shaped as a star. I accompanied it with a tea light and some fir twigs. The edges of my porcelain star are also shadowed with stamping color. It’s a really nice set for your center piece. It could be realised in every differtent color.


Angel

2018_Engel

Every year again I really enjoy finding new kinds of lovely angels. This year I found one at the Christmas fair in Raesfeld . I took it home, opened it and made new ones myself. Inside the angel you’ll find a Rocher hazelnut chocolate but you may take any other chocolate with a diameter of maximum 3cm. Use it as a hostess gift or take it as a placeholder for your Christmas table.

It’s most impressive if you use some lightly structured card stock. The template needs to be cut out twice. Then cut and fold every angel’s slot. Glue lower and upper paper bar on top of the other and when dried put the chocolate inside. Then fix both heads with a tiny golden thread tied around the angel’s neck. If you want to use it as a place holder then write down the guest’s name on one of the wings or put a little name tag on top of the chocolate.


Lovely ghosts

2018_Halloween1

We’ll turn back time this weekend and soon later lots of little scary figures will ring the doorbell shouting: “Trick or treat?” Simply take some sandwich bags to have some ghosts on your window sill. Paint funny ghost faces with a black felt pen and cut the bag’s bottom into 1cm wide stripes. In order to fix them on a chain of lights cut small slit on both sides of the bag to pull the chain through the bag from one side to the other. Thus the bag’s bottom will hang over your chain.

2018_Halloween2

I placed some lovely colored leaves beside my ghosts. They weren’t found in our woods but in our kitchen. Their big advantage. they won’t dry, won’t crumble lateron and even for kids it’s quite easy to make them.  You’ll need filter paper and kids water colors. Use a plastic tray to work on. First lightly wet the paper with clean water, then take up the selected color with a soft paint brush and dab color on your filter paper. When dry, cut different leaves. In case of two-layered filter bags cut the leaves so that a small part of the bag’s bottom still sticks together. That allows you to simply hang them over one of the lights. Cut a small slit into single-layers filter paper and pull the chain through it alternating with the ghosts.