Flying angels

2017_Engel4

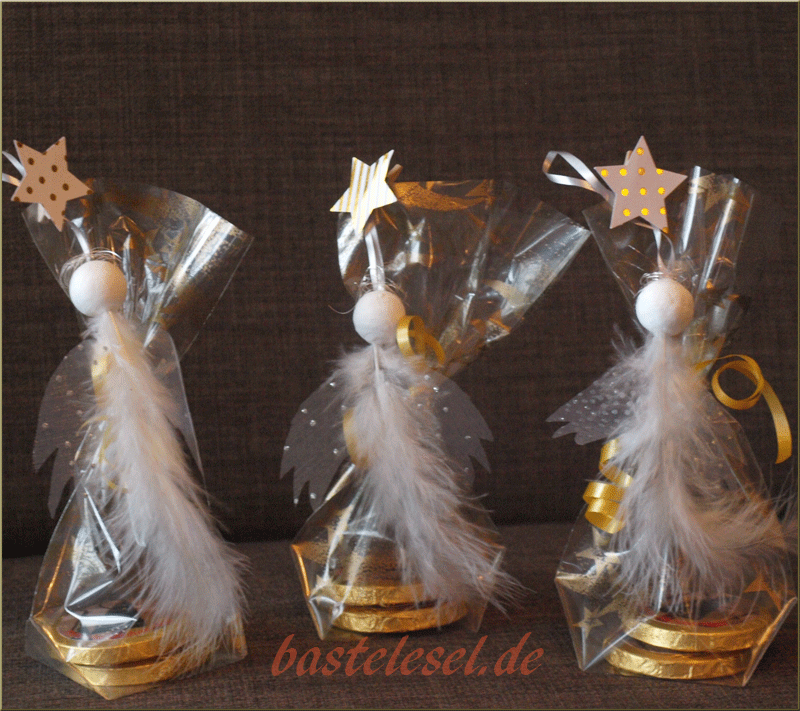
If you’re looking for a last minute Christmas gift then you’re quite right with these lovely angels. Put some chocolates or hand made cookies in a cellophane bag and close with a matching curling ribbon. You’ll need white feathers, cotton balls, wrapping tissu or translucent paper, a thin thread and a bit of angel hair. Insert the quill’s top into the cotton ball and glue. Cut out wings with a break line using my template and put a small dot of glue on the fold. Then attach wings to the feather’s back. Take a short piece of ribbon to suspend the angel and glue it to the top of the angel’s head. Twist some angel hair and pullit over the ribbon. Fix it with a tiny little drop of glue at the back of the head. Now just hand the angel over your fastened cookie bag or attach it with the help of a small clothpin. (mine are decorated with a paper star)


Cutlery bags

2017_Bestecktasche1

For Christmas we love to take some more efforts and this year we’ll have some very nice cutlery bags, folded or sewed ones. For the left and right bag I found two lovely video instructions you’ll only have to follow. For the red bag I simply inserted an additional paper napkin after the two top layers were folded (min. 1.18). Matching with the grey star napkin color I fastened fork and knife with a grey and white ribbon. For the red napkin I chose a twine loop an a small fir twig. Both are just laid on top of the bag.

2017_Bestecktasche2

The right pouch is made with cotton fabric. I even found a nice template on the site of Samelia’s Mum. It’s very easy and I just didn’t have to change or add something. Instead of folding the B-piece in half I just cut two halves and placed a small folded stripe of cotton in between. Therefore place the folded cotton stripe, right sides out, on top of one half’s right side. Put second half on top with right side down. Then stitch at 1/5″ from the edge. Turn inside out and put it on one of the backside parts. Once the cutlery inside I’ll put two ribbon loops and a small pine cone on top. Lops and cone are joined with liquid glue. Choose your fabric according to dishes or other table decoration parts.


Angel

2017_Engel1

Christmas time – angels are floating in every room. This year they’re hanging amidst some white colored beech branches. Every year I have to throw away some of my angels because they’re looking a bit scuffed after being packed and unpacker several times. Fonrtunately there’s a new generation of angels every year. This year I found them on a Scandinavian website but without any instructions. After some drawing attempts I finally found a shape I liked. Download the template for free if you want.

2017_Engel2Cut out body and wings from desired card stock. Prepare a wooden or cotton ball for the head and cut a 8-10cm long ribbon to suspend the angels. Pull the paper body over the back side of a ruler so that the body will curve a bit. Place wings and ribbon loop between both ends of the angel’s body and fix with glue. cut a small collar if you like, prick a small hole in the center to go through it with your ribbon. Then add the head ball and glue both. The template contains two different sizes of angels. With the help of a copier you may increase or diminish it.
(Instructions for grey angel on the right side.)

2017_Engel3

Above a further window decoration with some of my this year angels hanging on a wooden branch with a paper Christmas tree and paper stars. The wood is decorated with fir twigs and these are fastened with fairy lights. These little lights will make the angels’ wing glow in the dark.


Christmas Crowns

2017_Krone1

Here we have some more crowns decorated for Christmas. Take the fotos to get inspired and I think they don’t need any further explanation.

2017_Krone2

All kinds of ribbons, chunky wool or thin wires with elegant pearls are perfect for decorating the tin crowns. Fix little stars and further accessories with hot glue. Use florist foam inside for the pine and cypress twigs. Put a piece of foam in some wrapping film without covering the surface. Thanks to the moistened foam the twigs will last much longer.

  • Show All
  • Christmas Crowns


St Nicholas’ boots

2017_Stiefel

We’re looking forward to Christmas season but there’s some projects that simply need some more time to be well prepared. This year it’s my St Nicholas’ boots project. When I was young we had some red plastic boots which we placed in front of our bedroom door on St Nicholas’ Eve to find them filled with chocolate and other goodies the next morning. During the last years we more and more adapted the english tradition of hanging Christmas stockings but we’re hanging them up on St Nicholas’ Eve replacing the ancient boots. For a group of girls sharing a flat I decided to sew some fashionable boots perfectly made to be hanging at a stair rail garland.

Fold your fabric in half, left sides out and cut out the pattern twice. Sew both parts together and cut seam allowance with pinking shears to avoid unravelling. Turn your boot to have the rigth side out. The top of the boot leg may be seamed or edged with a cotton ribbon. We chose a 4cm wide red ribbon that needs to be folded in half lengthwise. Cut a piece of ribbon corresponding with the boot leg’s circumference with 1cm seam allowance. Close your ribbon to a round and put it over the edge of your boot leg. Fasten with a backstitch.

2017_Stiefel2

If you want to hang your boots you need to add a small loop. Take a piece of your edging ribbon or just another kind of woven ribbon matching with your fabric. Sew it to the boot leg’s rear seam. You may as well sew your boots manually if you don’t habe a sewing machine. Choose a matching or contrastive thread and sew with a buttonhole stitch on the right side of fabric.

Fill your boots with little sweets and other goodies. If you want to realise a lite version then for example choose nail varnish, nail files, a foot balm and more – all you need to care for your feet.