Christmas under glass

Centerpiece

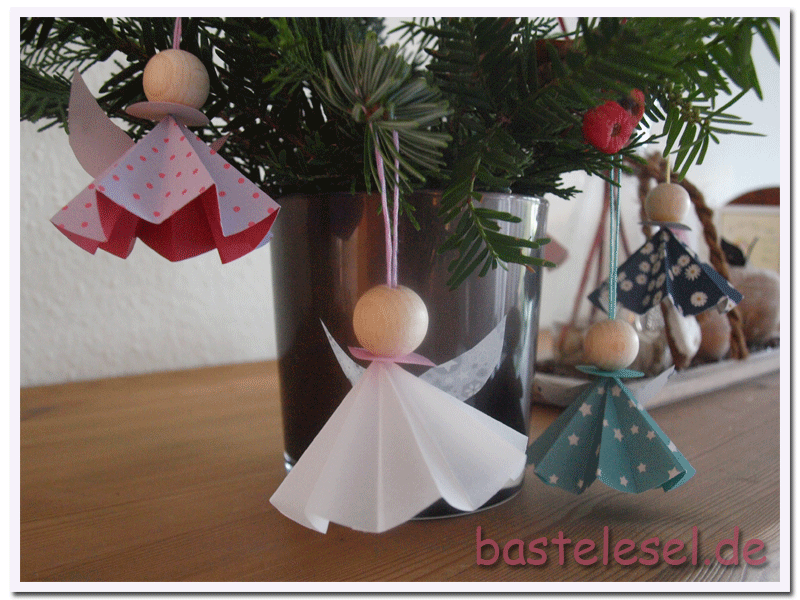
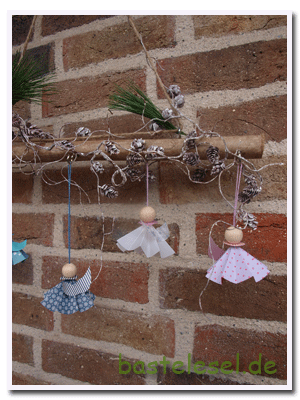
Asistance for allergic persons – with this center piece you can put fir and pine twigs in your house without suffering from allergic symptoms supposed you replace the tree disc by a felt or paper disc. (even the disc may cause allergic reactions) For everybody else it’s just a lovely decoration that, if necessary, can be set aside quite easily. Twigs, christmas balls and other tiny accessories are placed under a large turned glass pillar candle holder. Place some tea light holders beside it for the glow. Those who want even more may put an LED tealight holder under the glass. Smaller glasses would be perfect as place holders – more about that within the next days.


Dancing angels

Engel1

Christmas without angels, can’t imagine. My this year’s version seems to dance arount the vase. That’s probably due to the lovely pleated dresses. For making them you’ll need some nice Christmas papers, wooden balls mesuring about 1,5cm in diameter and some ribbon to hang them up. I found these angels on cchobby.de but instead of origami paper I took Christmas papers to cut out the 10cm circles for the dresses. The circles need to be folded into 16 parts. That’s easily done when fold it in eighth and after that once to a half circle. Now each of the twofold four eigth can be folded once again so that in the end you’ll have 16 triangles. I will be easier to pleat the dress neatly when all former folds where done in both directions. Engel2Cut out collar and wings chosing papers in matching colors. Free templates are here. Take a 15cm ribbon and pull it through dress, collar and wooden ball with the help of a needle. I choose a brillant bead yarn to complete the angels. Tie a loop at the end and fix the head to it’s collar with a drop of liquid glue. This avoids the head to slip over the knot accidentally. If you want to put the angels on your table choose a lighter white cotton ball instead and glue head, collar and dress together. This year my angels are dancing in the window hanging from a decorated branch. The reflecting window however ruins the fotos so that I simply placed them outside in front of a wall to show their beauty.

Roly-poly Santas

Nikolaus1

Looking for Christmas cookies I found a wonderful video instruction for these roly-poly Santas on the site of Better Homes and Gardens. I really like them and must admit that I couldn’t add any further explanations.  Instead of the bhg recipe  I took the one of my Santa cookies. Decorate them as you like and be sure that everybody will love them.

Sparkling star


Dekostern1

There’s not enough space on every table to place a large Christmas decoration. These Christmas balls are glued to the star’s bottom so that it can be put upright and doesn’t need too much space. If you want to stand it upright in the center of your table you should put it on a stand like two smaller stars.

Dekostern2Dekostern4

Chistmas balls in your favourite colors, some smaller accessories, a hot-melt gun and a framed wooden star is al you need. Take off the balls’ hangers and glue them to the star’s bottom with their neck. Decorate with some additional wooden Christmas ornaments and lean it against the wall. If you can’t get enough of all the sparkling Christmas world put a tea light in front of your star to make the balls shine or put a battery-driven light string among the balls. In order to avoid seeing the battery case fix it to the star’s back with a double-faced adhesive tape and pull lights through a hole in the back. Most of these stars are having a very thin back so that you just need a hand brace to drill a hole in the necessary size. Without a light string you may even hang up your star.


Last advent calendar

Adventskalender2015-9

Only a few days left until December 1st but still enough time to create this easy advent calendar that doesn’t need too much space and if necessary is to be put aside. You’ll find etagères in every deco store or shops for baking supplies but it’s more fun to make one yourself. I took two wooden stars in different sizes which are connected with a round bar. It’s simply fixed to the lower star with a screw coming through the star’s bottom. Both, bar and bottom need to be drilled (use a simple hand drill) in order to screw them together. The upper star will get a center hole the size of the bar’s diameter. Push your bar through that hole and fix it with some wood glue. The bar should surmount the upper star for about 10cm and the top is decorated with a small Christmas star and colored ribbons. Matching with the star’s wood I chose some brown paper and repeated the elks’ color by writing the calendar numbers on red Christmas balls. The content of your gifts may vary from sweets to sanitary products, to make-up articles, raffle tickets or vouchers. Choose what you like or what the addressee would like.