Felt Dwarf

Filzwichtel5
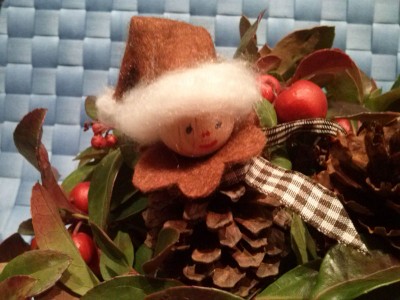
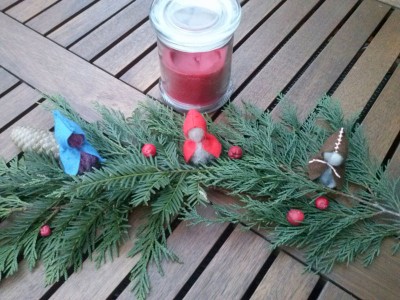
The traditional colours for these little felt dwarfs are red and white. Today I’ll suggest some other felt colours and another felting wool colour too. Draw hoody along breaking line on chosen felt according to pattern , cut out and sew top with backstitch. To close cape insert a thread with running stitch just below the hood and leave about 4 inches on each side to be knotted later. Then turn cape, take a skein of wool (about 5-6 inches) and make a knot in the middle of it. Now turn one loose end, place it over the knot and place the little figure under the hood. Arrange “head” and “body” beneath the cape and then fix the threads hanging on both sides of it. If necessary the wool at the bottom of your little dwarf has to be trimmed. If you want to suspend it on a little branch you need to fix a thin thread at the tip of its hood. The hood may also be closed on its outside with a button hole stitch. I’ve taken a bright stitching yarn for this and also for the closure of that little cape. I left 0.4 to 0.7 inches hanging down from the knot so that it looks like a little shawl.

  • Show All
  • Filzwichtel – Felt Dwarf

Little Imp

Zapfenwichtel8I chose a brown outfit for that little imp I made to demonstrate the how-to-instructions. It matches very well with my other accessories and it even forms a nice contrast with the dark brown of the cone. My demonstration cone is about 2 inches high and has a diameter of 1.5 inches. Accordingly I took a wooden ball of 0.8 inches. If you take smaller or bigger cones you should alter the size of the head ball too. It’s best to take a ball with a hole at least on one side so that you can fix the head on the tip of the cone. Before that cut a collar of the brown felt and fold it in the middle. With a very smal cut you’ll have a little hole to put it over the tip.
You’ll find a pattern for collar and jelly bag cap here. They have to be adapted to the size of head and cone too. Take the quadrant, turn it to a cap and fix the sides with glue. Then place some cotton with a bit of glue around the head and a little ball of it on the tip of the cap. Take a ribbon of about 4 inches length as a shawl and tie it round the cone just beneath the collar. You may paint a face but it’s not essential.

  • Show All
  • Wichtel – Little Imp

Wintergreen

Scheinbeere1The gift of a real good friend – and without any accessories this wintergreen with its red berries is a bright spot in these dark winter days. The indecidous shrub decorates itself with bright red berries and develops a lovely red brown coloring of its leaves as long as it gets enough sunlight in winter. It can be cultivated in pots as well but to keep its berries it has to be watered regularly. A half shade place guarantees the continuous development of new berries. If necessary the wintergreen should be cut short after blooming but never the withered flowers because they’re bearing the future berry. No manuring (preferably rhododendron manure) from July to August/September thus giving new sprouts the chance to mature and withstand frost.
With good care the berries will stay the whole winter through so that you can decorate it successively with autumnal or Christmas accessories. I’ll show several different decorations in my gallery. The instructions for my self-made imps and dwarfs will follow in the next posts.

  • Show All
  • Scheinbeere - Wintergreen

Knitting Board

Loom4Christmas is approaching and with it the search for Christmas gifts. What about a knitting loom for children but for grown ups as well. Without any precognition it’ll enable you to knit shawls, cuffs, pockets for cell phones and headbands. On one website I even found an instruction for a shawl with plait pattern. The wool is stretched between pegs and stitching can be started. Most sets include the knitting board, a crochet hook and 1-2 sorts of wool. For the first rows however I used my thick darning needle to slip the yarn. It’s really quite easy and with a little help of grown ups even kids being 8 or 9 years old will manage to knit. A wonderful gift for Christmas to be enhanced with some nice wool. Even more successful will be to give it together with a knitted shawl or headband knitted in advance.

  • Show All
  • Loom

Hazelnut Cookies

They look like the first Christmas cookies but weren’t meant to be. I simply wanted to use the remaining egg yolk of my meringue pastry. The original recipe found on “Rezeptwiese.de” proposes  to cover the cookies with icing sugar. For half of my cookies I chose a chocolate top which we liked very much too. In any case both sorts of cookies are suited for Christmas.

Hazelnut Cookies
Write a review
Print
Prep Time
15 min
Cook Time
15 min
Total Time
30 min
Prep Time
15 min
Cook Time
15 min
Total Time
30 min
Cookies
  1. 3 egg yolk
  2. 4.2 oz sugar
  3. 1 bag vanilla sugar
  4. 3 drops of lemon flavour
  5. 1 point of a knife baking powder
  6. 8.8 grounded hazelnuts
  7. plastic wrap
Icing
  1. 3.5 oz powdered sugar
  2. 1.5 tbsp lemon juice
Preparation
  1. Put parchment paper on baking tray
  2. Fan assisted oven: 350°F
Cookies
  1. Whip egg yolk with sugar and vanilla sugar until it's really creamy. Then add lemon flavour, baking powder, grounded hazelnuts and knead carefully. Flatten the pastry between two layers of plastic wrap and roll out. Cut out little hearts or other foms and place them on your tray.
  2. The pastry doesn't rise too much so that you can place them side by side. The baking time is about 15 minutes at 300°F. Then place the cookies on a rack to cool.
Notes
  1. You may take grounded almonds for this recipe as well.
Bastelesel http://www.bastelesel.de/
Nussplaetzchen2