Advent calendar – PartIII

Adventkalender12 
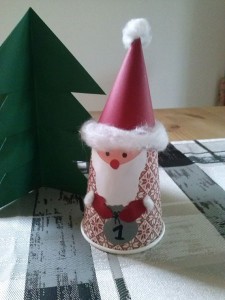
This is one of the calendars that needs a little bit more time but good planning and maybe a little help will allow you to finish it until December 1st. You’ll need 24 papercups to hide the candies, some Christmas papers and pink, red and white cardstock. The templates for coat, hat, face and gloves are to be downloaded here. I’ve just started and marked the No. 1 on a small sack which is glued between the gloves. A star or a Christmas ball looks nice too. Border of the hat, point and gloves are decorated with some wadding. I’ll place the 24 gnomes together with some origami Christmas trees on a tray or on a windowsill in the living room. When the candy’s taken away our little fellow will walk to the kid’s room. Thus they will see in one room how many days are still left until Holiday and in their room how many days have already passed by.

For all who don’t have time: Stars with numbers in red and blue to download for free. The complete body and hat of the gnome is available as a free template at raumdinge.blogspot.ch, find link for a printable pdf beneath Valentina’s pictures.

Adventkalender11

Decorative gift wrapping

Verpackung12

One of the lovely packages I made for my different advent calendars. It was either placed on the shelf or hung up in the tree. For the advent calendar just glue the numbers instead of a name tag. You can use gift wrapping paper that needs to be tailored to the desires size or Christmas Origami paper. It’s easy to make these “boxes” in different sizes so that everything from a nail polish bottle to a shower cream travel size will fit. Instructions are to be found beneath the galery pictures.

  • Show All
  • Dekorative Geschenkverpackung/Decorative gift wrapping/Emballage de cadeau


Stars at table

Star4Simple, quite natural and very easy to reproduce. The necessary test glasses are available at florists or crafting stores. Saw stars of about 5″ and drill a hole in the size of your test glass diameter a bit above the center of your star. Then remove the edges and color the star as you like. I took white color diluted with some drops of water and applied it with a sponge. The edges are shaded either in red or brown. I did it with the sponge too. Then sand the edges again to obtain the shabby look. Fill test glass with water and put through the hole of the star. Place star on the table so that two tips keep it grounded. Arrange some flowers in the glass and here you are with a lovely decoration.
If you belong to the generous people you can use these stars as table cards and give them away for Holiday.

  • Show All
  • Mit Sternen zu Tisch/Stars at table/L’étoile à table

Advent calendar – Part II

Adventkalender3This stylized Christmas Tree is a last year’s gift from a good friend. At that time it was too late for using it as a calendar but this year my little tree will work as such. It is made of different branches 1/2 – 3/4″ thick which are nailed to a triangle already resembling a Christmas Tree. The easiest way is doing it with an air nail gun but you can as well glue the branches or fix them with thin hemp rope. It looks really nice and highlights the 3-D effect if you nail small branches on both sides of the triangle.
Like for my first calendar proposal I’ll take bags, boxes or simply wrapped gifts. In between simply hang some Chistmas accessories and some fir-tree green just before giving it away.  Thus in the beginning the branches will be hidden under all the gifts. These gone on Christmas Eve you can add some Christmas balls and fresh fir-tree green to create a newly decorated tree.

  • Show All
  • Adentskalender – PartII/Advent calendar – part II/Calendrier de l’avent – le second

Advent calendar – Part I

Adventkalender2Here he is – my first advent calendar this year. I chose a white book shelf. First it’s a lovely advent calendar but after Christmas it doesn’t have to be removed. It will serve for storing books. To reach the calendar from all sides it can be leanded against a wall. Lateron it will be hung up with two screw anchors. This shelf is available in different sizes or make on yourself.
The little gifts are wrapped in different papers, boxes or fabric bags. In addition I placed some further Holiday accessories on the shelf boards. The numbers are still missing because I usually glue them in the end when dividing out all gifts. The boxes are made with the help of a Splitcoaststampers punch board but you can also buy different boxes. Some of the wrappings will be presented within the next few days.